
Summer is in full force and if it seems like your car’s air conditioner isn’t blowing as cold as it once did, there’s a good chance you simply need to recharge it.
Recharging the AC can be done in just a few minutes and typically doesn’t require any tools. I recommend using
a can of r134a refrigerant. Arctic Freeze works well and they sell the canister with a pressure dial on the outlet tube. Note: You definitely want to grab the one with the pressure gauge so you can measurethe amount of pressure in the system prior to, and during the recharging.
Today we’re recharging the AC in a 1999 Honda Accord and this simple technique applies to a great many number of import and domestic cars model years 1986 and newer. Ok, so let’s stop sweating and get to work! Just follow these easy steps and you’ll be feeling COLD air again in no time.
- Turn the car engine on
- Turn the Air Conditioner on (put it on High)
- Purchase a can of r134a refrigerant from your local auto parts store (ensure it has the pressure gauge on the outlet tube)
- Use protective eye wear. (Refrigerant is harmful to the eyes and the entire system is high-pressure so safety is important.)

Once the car is started and you have the AC on high, you’ll want to do a quick check and look at the air compressor. Look either at the belt assembly, or follow the compressors inlet tube back to locate the compressor. Air compressors need a belt to make them function, and you’ll want to make sure that not only is the pulley wheel spinning, but also the compressor wheel in the middle. (We cover this in the video so you can see exactly where to look.) If the compressor wheel is not spinning, then you have a faulty compressor which is the main source of the problem. If it is spinning, then great! You just need to recharge the AC system as follows.
- Locate the air compressor’s inlet tube. It’ll have a cap that you can unscrew by hand and is located on the top of a high-pressure metal line/tube that leads back to the air compressor.
- Unscrew the cap, and check the system’s current pressure level with the pressure gauge supplied with the refrigerant.
- Identify what the level of pressure SHOULD be in your car’s AC system. NOTE: You need to make sure you review the chart on the back of the refrigerant which will have a current (ambient) temperature comparison chart. You compare the ambient temperature (the temperature outside) and match it to the amount of pressure your AC system should have.
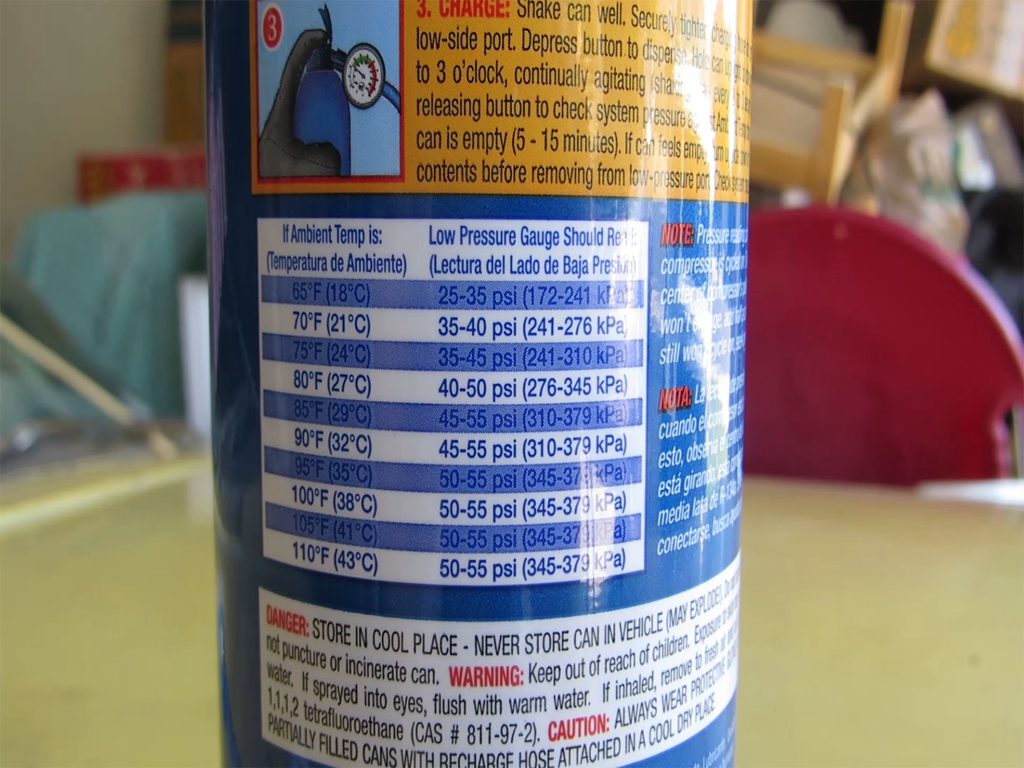
In our example, it was 100 degrees outside, which set the optimal pressure at 55 psi. When we first checked the AC system, it registered at 25 psi. Therefore with some simple math, we knew we needed to add about 30 psi of r134a.
System Pressure before recharging: 25 psi
Optimal Pressure Goal: 55 psi
TARGET: Add 30 psi of refrigerant to the car’s AC system
Now you’re ready to start injecting the car’s AC system with refrigerant.
- Shake the can of refrigerant vigorously for 15 seconds. NOTE: you will need to re-shake / agitate the can while you are injecting the refrigerant. Otherwise pressure will build in the system without the refrigerant actually getting in there. This is a very important step.
- Attach your refrigerant canister to the pressure gauge tube.
- Depress the button/Tap the button on top of the canister to release refrigerant into the AC system.
- Watch the pressure gauge closely so that you don’t build too much pressure at once.
- Agitate the can by turning it from the 12:00 o’clock position to the 3:00 o’clock position.
- Repeat steps 3-5 until you meet your optimal pressure target.
That should be all you need and therefore, you’re only 10 minutes away from beating the heat and getting you car’s AC running COLD again. Here’s step by step video of how to recharge the AC in your car – COLD.
Enjoy!


